These libraries are maintained by the developers at Postmark and are the easiest way to integrate Postmark with your application.
If you can’t find the right library, check out our Community Libraries. If you’re looking for code to use with Postmark Inbound try our email parse code examples.
We’re building a wishlist of Postmark plugins, libraries, and integrations. If you have something you’d like to see, or would like to contribute, let us know!
Requirements
- Node.js 18+ or Bun
- TypeScript project (or ts-node)
Installation
npm install postmarkPOSTMARK_SERVER_TOKEN=your_server_token
POSTMARK_WEBHOOK_SECRET=your_webhook_secretimport { ServerClient } from "postmark";
export const postmark = new ServerClient(process.env.POSTMARK_SERVER_TOKEN!);Use sendEmailWithTemplate with a TemplateAlias and TemplateModel instead of inline HTML. This is the recommended path for all production transactional email — templates are reusable, testable, and give Postmark the context it needs to optimize delivery.
export async function sendWelcomeEmail(to: string, name: string) {
  const message = await postmark.sendEmailWithTemplate({
    From: "welcome@acme.example",
    To: to,
    TemplateAlias: "welcome",
    TemplateModel: { name },
    MessageStream: "outbound",
  });
  return message.MessageID;
}Type your TemplateModel to catch missing fields at compile time. Return the MessageID so your application can map the send back to a specific transaction.
type ReceiptEmail = {
  to: string;
  receiptId: string;
  amount: string;
  dashboardUrl: string;
};

export async function sendReceiptEmail(input: ReceiptEmail) {
  const message = await postmark.sendEmailWithTemplate({
    From: "billing@acme.example",
    To: input.to,
    TemplateAlias: "receipt",
    TemplateModel: {
      receipt_id: input.receiptId,
      amount: input.amount,
      dashboard_url: input.dashboardUrl,
    },
    MessageStream: "outbound",
  });
  return message.MessageID;
}Use Promise.allSettled instead of Promise.all so one failed recipient doesn't mask successful sends. Each result includes the MessageID for successful sends and the error reason for failures.
export async function sendBatchWelcome(
  recipients: Array<{ email: string; name: string }>
) {
  const results = await Promise.allSettled(
    recipients.map((r) =>
      postmark.sendEmailWithTemplate({
        From: "welcome@acme.example",
        To: r.email,
        TemplateAlias: "welcome",
        TemplateModel: { name: r.name },
        MessageStream: "outbound",
      })
    )
  );

  return results.map((result, index) => ({
    email: recipients[index].email,
    ok: result.status === "fulfilled",
    messageId:
      result.status === "fulfilled" ? result.value.MessageID : undefined,
    error:
      result.status === "rejected" ? String(result.reason) : undefined,
  }));
}Always verify webhook signatures using the raw request body — not parsed JSON. Pass POSTMARK_WEBHOOK_SECRET as your HMAC key. Use timingSafeEqualto prevent timing attacks.
import crypto from "node:crypto";

export function verifyPostmarkWebhook(
  rawBody: string,
  signature: string
): boolean {
  const expected = crypto
    .createHmac("sha256", process.env.POSTMARK_WEBHOOK_SECRET!)
    .update(rawBody)
    .digest("hex");
  return crypto.timingSafeEqual(
    Buffer.from(signature),
    Buffer.from(expected)
  );
}export async function handleEmailWebhook(
rawBody: string,
signature: string
) {
if (!verifyPostmarkWebhook(rawBody, signature)) {
throw new Error("Invalid Postmark webhook signature");
}
const event = JSON.parse(rawBody) as {
RecordType: string;
MessageID: string;
Description?: string;
};
if (event.RecordType === "Delivery") {
return { ok: true, id: event.MessageID };
}
if (event.RecordType === "Bounce") {
return { ok: false, id: event.MessageID, reason: event.Description };
}
return { ok: true };
}If your integration isn't working, check this table before switching providers.
| Failure mode | Fix |
|---|---|
| POSTMARK_SERVER_TOKEN missing | Set POSTMARK_SERVER_TOKEN in your environment |
| TypeScript import error | Use import { ServerClient } from "postmark" — not require() |
| Template payload error | Pass TemplateAlias as a string and TemplateModel as an object |
| Webhook verification failed | Pass the raw request body to the verifier, not req.body after JSON parsing |
| Batch send failure | Use Promise.allSettled — Promise.all throws on the first rejection |
| MessageID missing | Await the send call and read result.MessageID from the response |
Requirements
Installation
Install from PyPI as postmark-python (the Python package you import is still postmark):
pip install postmark-python
The SDK is fully async. All API calls must be awaited.
pip install postmark-pythonimport asyncio
import os
import postmark
# Tokens are read from the environment here. Optionally: pip install python-dotenv,
# then use load_dotenv() to populate os.environ from a .env file.
async def main():
async with postmark.ServerClient(os.environ["POSTMARK_SERVER_TOKEN"]) as client:
response = await client.outbound.send({
"sender": "sender@example.com",
"to": "recipient@example.com",
"subject": "Hello from Postmark",
"text_body": "Sent with the Postmark Python SDK.",
})
print(f"Sent: {response.message_id}")
asyncio.run(main())
| Client | Token | Use for |
| ServerClient | Server API token | Sending email, bounces, templates, stats, webhooks, streams |
| AccountClient | Account API token | Domains, sender signatures, managing servers, data removals |
import postmark

# Use as async context managers to ensure connections are closed
async with postmark.ServerClient(os.environ["POSTMARK_SERVER_TOKEN"]) as client:
    ...

async with postmark.AccountClient(os.environ["POSTMARK_ACCOUNT_TOKEN"]) as account:
    ...

# Or call close() explicitly when done
client = postmark.ServerClient(os.environ["POSTMARK_SERVER_TOKEN"])
await client.close()git clone https://github.com/ActiveCampaign/postmark-python.git
cd postmark-python
poetry install
poetry run pre-commit install# Run tests
poetry run pytest
# Lint and type-check
poetry run pre-commit run --all-filesContributing
Support
License
MIT — see LICENSE.
You will need the Postmark Rails gem for drop-in integration with ActionMailer.
Don’t forget to run the bundle install command every time you change something in your Gemfile.
The postmark_settings hash can contain all options supported by Postmark::ApiClient.
gem 'postmark-rails'postmark_api_token: "xxxxxxxx-xxxx-xxxx-xxxx-xxxxxxxxxxxx"config.action_mailer.delivery_method = :postmark
config.action_mailer.postmark_settings = { :api_token => Rails.application.secrets.postmark_api_token }Here’s a simple example of how to send a single HTML email with open tracking enabled. Take a look at the README for more examples.
class TestMailer < ActionMailer::Base
  def hello
    mail(
      :subject => 'hello',
      :to  => 'receiver@example.com',
      :from => 'sender@example.com',
      :html_body => '<strong>Hello from Postmark!<strong>',
      :track_opens => 'true'
    )
  end
endYou will need the Postmark gem to get started.
If you’re using Bundler, don't forget to run the bundle install command every time you change something in your Gemfile.
gem 'postmark'client = Postmark::ApiClient.new('server token')Here’s a simple example of how to send a single HTML email with open tracking enabled. Take a look at the README for more examples.
client.deliver(
  from: 'sender@example.com',
  to: 'receiver@example.com',
  subject: 'hello',
  html_body: '<strong>Hello from Postmark!<strong>',
  track_opens: true
)The Postmark.NET NuGet package makes it easier to use the Postmark API from your .NET projects without having to build your own API calls.
If you need a strongly-named/signed .NET dll, you can use the Postmark-Strong .NET Nuget package which includes the JSON.NET dependancy built-in to avoid versioning conflicts.
PM> Install-Package Postmarkusing PostmarkDotNet;Here’s a simple example of how to send a single HTML email with open tracking enabled. Take a look at the wiki for more examples.
var message = new PostmarkMessage()
{
    To = "recipient@example.com",
    From = "sender@example.com",
    TrackOpens = true,
    Subject = "A complex email",
    TextBody = "Plain Text Body",
    HtmlBody = "<html><body><img src=\"cid:embed_name.jpg\"/></body></html>",
    Tag = "business-message",
    Headers = new HeaderCollection{
        {"X-CUSTOM-HEADER", "Header content"}
    }
};

var imageContent = File.ReadAllBytes("test.jpg");
message.AddAttachment(imageContent, "test.jpg", "image/jpg", "cid:embed_name.jpg");

var client = new PostmarkClient("server token");
var sendResult = await client.SendMessageAsync(message);The Postmark Java library makes it easier to use the Postmark API from your Java 8+ projects without having to build your own API calls.
<dependency>
  <groupId>com.postmarkapp</groupId>
  <artifactId>postmark</artifactId>
  <version>{version}</version>
</dependency>Here’s a simple example of how to send a single email. Take a look at the wiki for more examples.
Message message = new Message("from@example.com", "john@example.com", "Hello from Postmark!", "Hello body");

ApiClient client = Postmark.getApiClient("server token");
MessageResponse response = client.deliverMessage(message);The Postmark PHP library is available as a Composer package on Packagist.org.
composer require wildbit/postmark-phprequire_once('./vendor/autoload.php');
use Postmark\PostmarkClient;Here’s a simple example of how to send a single email. Take a look at the wiki for more examples.
$client = new PostmarkClient("server token");

$sendResult = $client->sendEmail(
  "sender@example.com",
  "receiver@example.com",
  "Test",
"Hello from Postmark!");The Postmark Craft plugin library is available as a Composer package on Packagist.org.
You can also install the plugin via the Craft Plugin Store.
cd /path/to/my-project.testcomposer require craftcms/postmark./craft install/plugin postmarkConfiguration
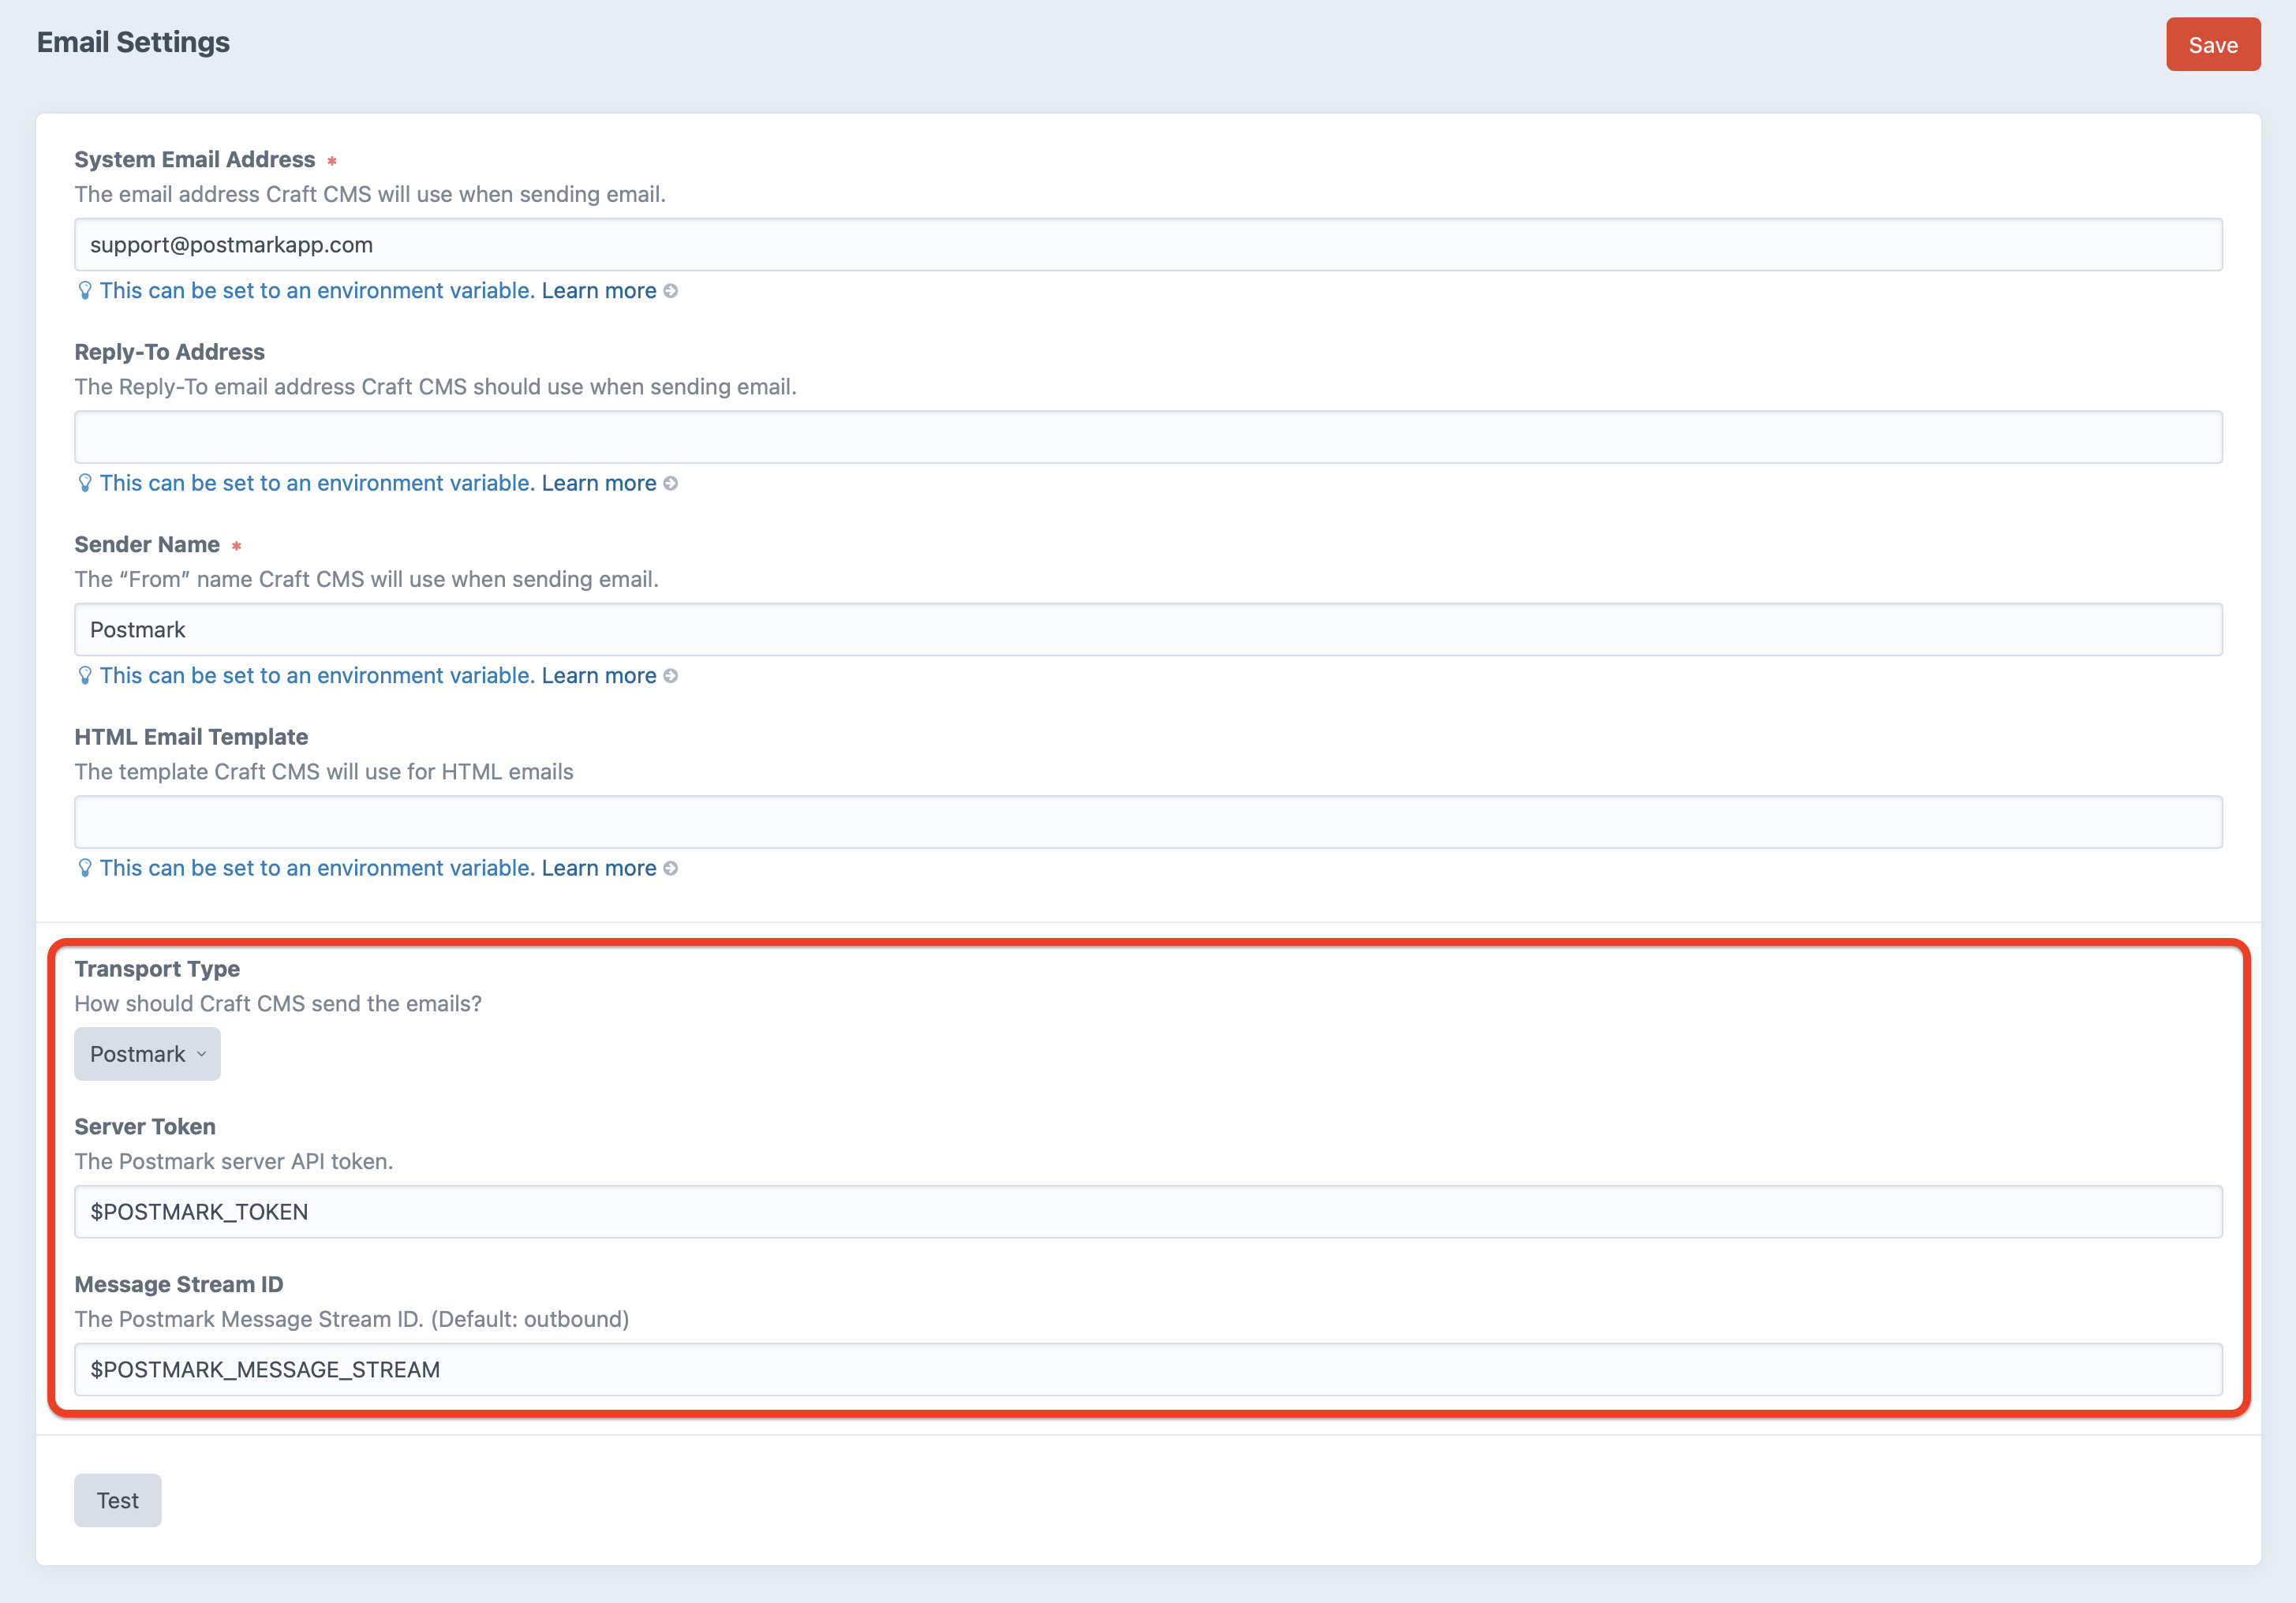
Once the Postmark Craft plugin is installed, go to Settings → Email in the Craft admin area, and change the Transport Type setting to Postmark.
Then enter your Postmark Server Token. This can be found on the Server → API Tokens page within your Postmark account.
If you wish to send email using a custom Message Stream, set the Message Stream ID. (The default transactional Message Stream will be used if this is left blank.)
When you’re done, hit Save.
Tip! Your Postmark Server Token and Message Stream ID can also be set using environment variables. See Environmental Configuration in the Craft docs to learn more about that.
The Postmark Node.js library is available as an npm package.
npm install postmark --savevar postmark = require("postmark");import { ServerClient } from "postmark";Here's a simple example of how to send a single email. Take a look at the documentation for more examples.
var serverToken = "xxxx-xxxxx-xxxx-xxxxx-xxxxxx";
var client = new postmark.ServerClient(serverToken);

client.sendEmail({
    "From": "sender@example.com",
    "To": "receiver@example.com",
    "Subject": "Test",
    "TextBody": "Hello from Postmark!"
});import { ServerClient } from "postmark";
const client = new ServerClient(process.env.POSTMARK_SERVER_TOKEN!);
const result = await client.sendEmail({
From: "sender@example.com",
To: "receiver@example.com",
Subject: "Test",
TextBody: "Hello from Postmark!",
MessageStream: "outbound",
});
console.log({ messageId: result.MessageID });For production transactional email — receipts, welcome emails, password resets — use sendEmailWithTemplate with a TemplateAlias and typed TemplateModel. This keeps your email layouts separate from application code and returns a MessageID you can use to correlate delivery and bounce webhooks. See the TypeScript integration guide → for batch sending, webhook verification, and a repair guide.
import { ServerClient } from "postmark";

const client = new ServerClient(process.env.POSTMARK_SERVER_TOKEN!);

const result = await client.sendEmailWithTemplate({
  From: "billing@acme.example",
  To: "customer@example.com",
  TemplateAlias: "receipt",
  TemplateModel: {
    receipt_id: "rcpt_123",
    amount: "$49.00",
    dashboard_url: "https://acme.example/dashboard",
  },
  MessageStream: "outbound",
});

console.log({ messageId: result.MessageID });You can optionally use nodemailer to send transactional emails through Postmark.
Installation
Before you get started, install Node.js and make sure that your Postmark server and account tokens are handy.
From the command line, run:
npm i postmark-cli -gOnce npm does its thing, run the postmark command and you will see some high-level usage details. You’re all set!
Pro tip: You’ll be asked to authenticate by entering your server or account token each time you run a command. If you prefer, you can bypass this step by supplying tokens as environment variables.
Usage
After installation, type postmark in your command line to see a list of available commands. Check out the wiki for instructions on how to send emails, manage templates, or list servers.
$ postmark

  Commands:
    postmark email <command></command> [options]      Send an email
    postmark servers <command></command> [options]    Manage your servers
    postmark templates <command></command> [options]  Pull and push your templates

  Options:
    --version  Show version number
    --help     Show help
Further documentation
Postmark for WordPress (fork on Github)
/wp-content/plugins directorySee the FAQ for answers to common questions.
The Postmark Grunt plugin is available as an npm package.
npm install grunt-postmark --savegrunt.loadNpmTasks("grunt-postmark");Here’s a simple example of how to send an email. Take a look at the documentation for more examples.
grunt.initConfig({
  postmark: {
    options: {
      serverToken: "server token",
      from: "sender@example.com",
      to: "receiver@example.com",
    }
    email: {
      subject: "Test",
      src: ["email-content.html"]
    }
  }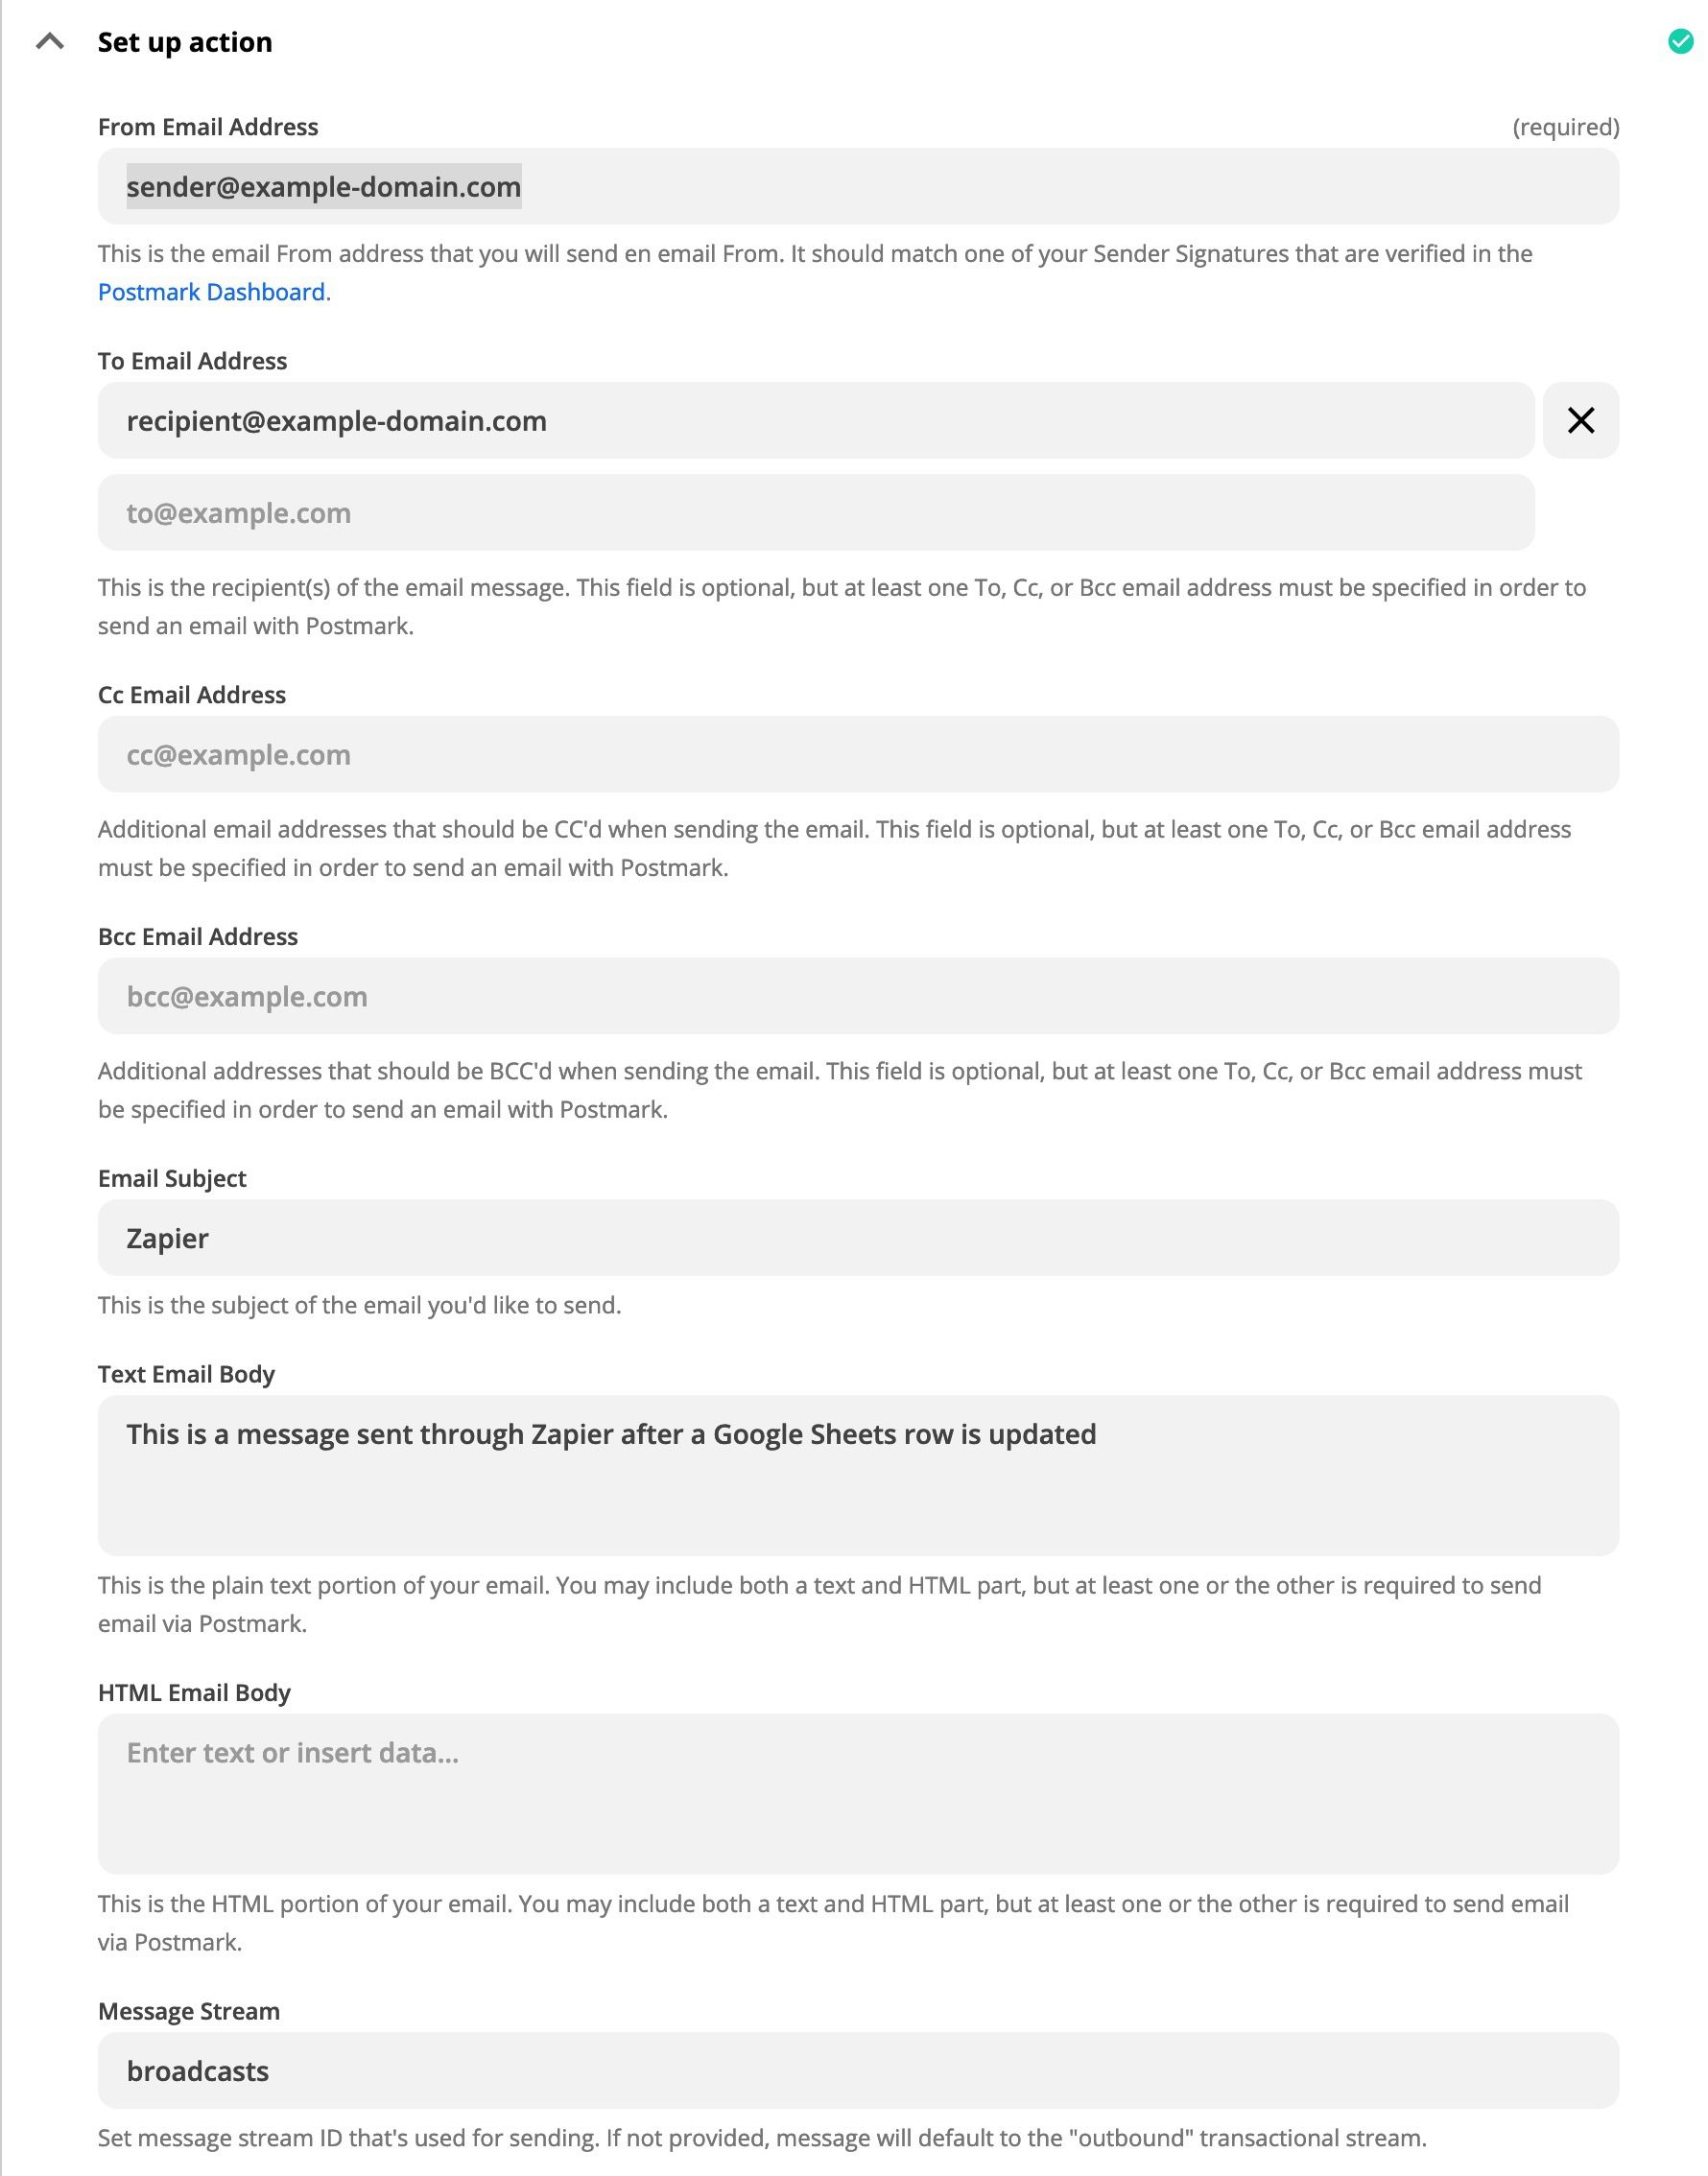
});The Postmark Zapier Actions are available on Zapier.
Our Zapier Actions support both Send an Email and Send an Email With Template. When integrating with a Zapier Trigger, set the data into the respective fields when Zapier prompts, like To, From, Subject, etc.
If you wish to send email using a custom Message Stream, set the Message Stream ID. (The default transactional Message Stream will be used if this is left blank.)