

Do you know every source of email for your domain? Are spammers trying to spoof your email domain for hacking or fraud opportunities? Are you complying with the best email practices to ensure inbox delivery? These are the questions that DMARC answers, giving you full control of email delivery for your company’s domain.
At Postmark, email authentication has been extremely important to us from day one. We believe that anyone should be able to easily send emails with proper infrastructure, tools, and email standards without having to pay enterprise prices. DMARC, and our support of it, is a big part of this mission.
We wrote everything you need to know about DMARC below—but before you get started, how about a 4-minute video about DMARC featuring a raft of very authentication-focused ducklings?
Video Summary #
What is DMARC? #
DMARC (Domain-based Message Authentication, Reporting & Conformance) is a standard that prevents spammers from using your domain to send email without your permission — also known as spoofing. Spammers can forge the “From” address on messages so the spam appears to come from a user in your domain. A good example of this is PayPal spoofing, where a spammer sends a fraudulent email to you pretending to be PayPal in an effort to obtain your account information. DMARC ensures these fraudulent emails get blocked before you even see them in your inbox. In addition, DMARC gives you great visibility and reports into who is sending email on behalf of your domain, ensuring only legitimate email is received.
The good news is that DMARC is open and free for anyone to use, allowing you to secure your domain’s emails and gain control of your email delivery. All you have to do is follow the implementation steps in this guide and choose an ESP who supports DMARC.
What are the benefits of implementing DMARC? #
DMARC is a key component of a brand‘s email security and deliverability strategy as it enables:
- Visibility - Monitor emails sent using your domain to ensure they are properly authenticated using SPF and/or DKIM.
- Brand Protection - Block spoofed messages that might damage your brand‘s reputation with customers.
- Security - Prevent users from falling victim to phishing scams that could compromise your organization‘s security.
Does DMARC improve deliverability? #
DMARC allows you to see whether emails sent using your domain are properly authenticated using SPF and DKIM. This allows you to identify and fix any authentication issues that can affect the deliverability of your emails.
Preventing spoofed emails from reaching users can lower spam complaints and protect your domain‘s reputation with ISPs.
How does DMARC work? #
Before you understand the DMARC protocol, you first need to understand two email authentication standards called DKIM and SPF. DMARC is built on top of these standards, so let’s go over them first. If you already know about DKIM and SPF, skip to the DMARC section.
DKIM (Domainkeys Identified Mail) #

DKIM is a method to validate the authenticity of email messages. When each email is sent, it is signed using a private key and then validated on the receiving mail server (or ISP) using a public key that is in DNS. This process verifies that the message was not altered during transit. This lets an ISP (Gmail for instance) inspect the message and make a decision if the message is still in the same state as when it was sent. In other words, it prevents someone from intercepting your email, altering it, then sending it along with new (and possibly fraudulent) information. Another little known benefit of DKIM is that ISPs use this information to build a reputation on your domain. If you have great sending practices (low spam, bounces, high engagement) this can help improve trust and reputation with the ISPs.
With DKIM, each email you send is signed with the private key stored on your mail server. Later ISPs can verify the integrity of a message by fetching a corresponding public key from a special DKIM record in your DNS. The cryptography behind this (the same used in SSL) guarantees that only messages signed with your private key will pass the public key check. This is what the public key might look like in your DNS:
pm._domainkey.domain.com IN TXT
k=rsa\; p=MIGfMA0GCSqGSIb3DQEBAQUAA4GNADCBiQKBgQDOCTHqIIQhGNISLchxDvv2X8NfkW7MEHGmtawoUgVUb8V1vXhGikCwYNqFR5swP6UCxCutX81B3+5SCDJ3rMYcu3tC/E9hd1phV+cjftSFLeJ+xe+3xwK+V18kM46kBPYvcZ/38USzMBa0XqDYw7LuMGmYf3gA/yJhaexYXa/PYwIDAQAB
The private key must be kept secret. If a malevolent user ever gets their hands on your secret key they will be able to forge your DKIM signatures.
If DNS is a bit over your head, don’t worry. Postmark (and other ESPs) offer step by step instructions that can be sent to a domain administrator to make this easier. What is important for now is that you understand why DKIM matters.
SPF (Sender Policy Framework) #

SPF is a way for ISPs (like Gmail, Yahoo, etc) to verify that a mail server is authorized to send email for a domain. It is a whitelist for the services who are allowed to send email on your behalf. Like DKIM, SPF also works via DNS. For instance, if you use Campaign Monitor to send marketing email and Gmail to send regular email, you can insert a DNS record that includes their mail servers as trusted sources to send email for your domain.
v=spf1 a mx include:spf.mtasv.net include:_spf.google.com include:cmail1.com ~allKeep in mind, a single sending domain should only have one SPF record. Each service you use is appended to the SPF record through “include” directives as in the example above.
SPF has become extremely important to verify who can send email on behalf of your domain and directly impacts email delivery. Not only is it needed for email marketing or your corporate email accounts, but you also need it for things like support (Zendesk, Helpscout, etc) or other providers who send email on your behalf.
When using Postmark for sending, SPF is automatically handled without having to add or modify DNS records. Postmark does require manual setup of a custom return-path to pass DMARC SPF alignment, however.
If you’re curious, you can verify if a message is properly signed with DKIM or is passing SPF by looking at the message headers. In Gmail, this can be seen using the “Show original” option. Here is an example for the postmarkapp.com domain:
Authentication-Results: mx.google.com;
  spf=pass (google.com: domain of pm_bounces@pmbounces.postmarkapp.com designates 50.31.156.117 as permitted sender) smtp.mail=pm_bounces@pmbounces.postmarkapp.com;
  dkim=pass header.i=@postmarkapp.com;
  dmarc=pass (p=NONE dis=NONE) header.from=postmarkapp.com
What do DKIM and SPF have to do with DMARC? #
Well, everything. With SPF and DKIM, it is up to the ISP to decide what to do with the results. DMARC takes it a step further and gives you full control to set a policy to reject or quarantine emails from sources you do not know or trust, all based on the results of DKIM and SPF. For instance, since PayPal is a huge target for email fraud, they publish a DMARC record that says if DKIM or SPF fails, reject the message. Participating ISPs will look at this policy and discard the emails that fail. In the 2013 holiday season, DMARC helped PayPal stop an estimated 25 million attacks according to a report by Agari.
tl;dr; DMARC lets you tell ISPs how you want them to behave if SPF and DKIM fail or are not present. Here's a diagram showing how SPF and DKIM work together with your DMARC policy.

Similar to SPF and DKIM, this policy resides in DNS. A typical DMARC record in DNS will look like this:
_dmarc.domain.com TXT v=DMARC1\; p=reject\; pct=100\; rua=mailto:dmarc-reports@domain.com\;The record above sets a policy to reject (p=reject) 100% (pct=100) if the email do not pass DKIM or SPF. Additionally, you can have ISPs send aggregate reports about these decisions to an email address (rua=mailto:dmarc-reports@domain.com). There is a lot more to this record and policy that we will get into shortly.
What should you do with DMARC reports? #
ISPs who support DMARC will also generate reports on sending activity for your domain. The reports are XML files that are emailed to the email address specified in your DMARC record. The reports contain the sending source (domain/IP) along with whether the message passed or failed SPF and DKIM. This is one of the best aspects of DMARC. Not only does it allow you to control email security for your domain, it also gives you deep visibility into who is sending on your behalf AND if they are signing with DKIM or passing SPF.

The problem with the reports is that you have to sift through an XML file. Here is what a typical XML report looks like:
<?xml version="1.0" encoding="UTF-8" ?>
<feedback>
  <report_metadata>
    <org_name>google.com</org_name>
    <email>noreply-dmarc-support@google.com</email>
    <extra_contact_info>https://support.google.com/a/bin/answer.py?answer=2466580</extra_contact_info>
    <report_id>4744268101791687049</report_id>
    <date_range>
      <begin>1398643200</begin>
      <end>1398729599</end>
    </date_range>
  </report_metadata>
  <policy_published>
    <domain>example.com</domain>
    <adkim>r</adkim>
    <aspf>r</aspf>
    <p>none</p>
    <sp>none</sp>
    <pct>100</pct>
  </policy_published>
  <record>
    <row>
      <source_ip>50.31.170.29</source_ip>
      <count>1</count>
      <policy_evaluated>
        <disposition>none</disposition>
        <dkim>fail</dkim>
        <spf>fail</spf>
      </policy_evaluated>
    </row>
    <identifiers>
      <header_from>example.com</header_from>
    </identifiers>
    <auth_results>
      <spf>
        <domain>ord-staging2.mtasv.net</domain>
        <result>pass</result>
      </spf>
    </auth_results>
  </record>
  <record>
    <row>
      <source_ip>50.31.156.116</source_ip>
      <count>2</count>
      <policy_evaluated>
        <disposition>none</disposition>
        <dkim>pass</dkim>
        <spf>fail</spf>
      </policy_evaluated>
    </row>
    <identifiers>
      <header_from>example.com</header_from>
    </identifiers>
    <auth_results>
      <dkim>
        <domain>example.com</domain>
        <result>pass</result>
      </dkim>
      <spf>
        <domain>pm.mtasv.net</domain>
        <result>pass</result>
      </spf>
    </auth_results>
  </record>
  <record>
    <row>
      <source_ip>50.31.156.118</source_ip>
      <count>2</count>
      <policy_evaluated>
        <disposition>none</disposition>
        <dkim>pass</dkim>
        <spf>fail</spf>
      </policy_evaluated>
    </row>
    <identifiers>
      <header_from>example.com</header_from>
    </identifiers>
    <auth_results>
      <dkim>
        <domain>example.com</domain>
        <result>pass</result>
      </dkim>
      <spf>
        <domain>pm.mtasv.net</domain>
        <result>pass</result>
      </spf>
    </auth_results>
  </record>
</feedback>
As you can see, those XML reports are no fun to look at. That is why we've created DMARC tools that take those ugly XML reports and transforms them into a thing of beauty. Be sure to check out our DMARC Digests app to better understand how we can help you monitor your DMARC reports in a more actionable way.
Protect your brand from email scammers
Our premium DMARC monitoring with a single dashboard to monitor all mail sources, 60 days of history, and actionable recommendations.
How do I setup and implement DMARC on my domain? #
Not even sure what DMARC is or how it actually works? No worries! Check out our video here that explains DMARC in under five minutes -- with the help of some adorable ducks 🦆
Setting up DMARC for your sending domain takes a bit of effort and time, but the benefits are well worth it. You'll need to create a DMARC record for your domain, observe and analyze the DMARC reports sent to you, and finally implement changes to your DMARC record's policy to ensure that only messages that pass DMARC reach your recipient inboxes.
We've broken this process down for you, step-by-step:
1. Generate a DMARC record #
The very first step to implementing DMARC is generating a DMARC record that you would then add to your domain's DNS provider. When you send a message using your domain, your recipient mail servers will be looking up that domain's DMARC record to understand how you'd like them to handle messages that do not pass DMARC.
You can generate the DMARC yourself or by using a paid tool that can generate one for you (as well as provide you some other added benefits). Here are the steps for each option:
Generate your own DMARC record for free
1. Here is an example of a DMARC record that you can use as a starting point:
v=DMARC1; p=none; sp=none; pct=100; rua=mailto:example@yourdomain.com;A DMARC record is complied of various tags that help receiving mail servers understand how exactly you'd like them to handle your messages. Here are some details of a few of those tags:
- v= indicates the the DMARC version
- p= specifies the domain policy (none, quarantine, reject)
- sp= specifies the subdomain policy (none, quarantine, reject)
- pct= dictates the percentage of messages that the policy applies to
- rua= the address that the DMARC reports should be sent to
2. Overall, the only tag value you have to change is the email address listed with the “rua=” tag. You would want to update that email address to an email address that you manage, where you wish to receive the DMARC reports that recipient mail servers will be sending to you.
3. And you're all set! Next, you'd just need to add that DMARC record to your domain's DNS settings. More on that here.
Generate a DMARC record using a DMARC reporting tool
While you can generate your own DMARC record for free using the above steps, you might find that you want to use a DMARC reporting tool to help you out instead. Not only will such tools generate a DMARC record for your domain, they can offer you reporting around your domain's sending. Like what sending sources are sending messages using your domain and whether or not those messages are passing DMARC. And good news everyone! We have a great tool to help you with just that!
💜The DMARC Digests app provides a fancy account UI and dashboard which provides on-demand access to 60 days of DMARC reports, recommendations on how to identify and authorize mail sources, and a single place to monitor all your domains. As well as access to a dedicated, DMARC-centric support team.
⚠️ Note that tools like DMARC Digests are not required in order for your domain to meet DMARC requirements. But, they do provide essential details that help you make informed decisions around your DMARC policy.
2. Add your DMARC record to your DNS #
All right! So you've generated a DMARC record, either on your own or by having a DMARC reporting tool generate one for you. The next step is adding that record to your domain's DNS provider's settings.
🥺 The bad news: Each DNS provider is a bit different, so there's no universal walkthrough.
😀 The good news: We have a handful of videos here that show you how to add a DMARC record to various DNS providers.
The general steps would be:
- Go to your domain's DNS provider's settings where you can add and manage records.
- Create a new TXT record.
- For the Host value, add "_dmarc".
- For the TXT value you'd add the DMARC record itself.
Here's an example of how this looks in GoDaddy:

5. Once saved, you should be all set to go. You can use a free tool like MXToolbox to confirm that your domain's DMARC record is valid.
🙋♂️ If you're running into any issues or questions of that process, your DNS provider's support team will be able to help walk you through their specific steps.
3. Analyze DMARC reports to identify passing, failing or missing sources #
Now that you've generated a DMARC record and have added it to your domain's DNS provider, you will start receiving DMARC reports from receiving mail servers.
You'll want to review these reports to better understand which sending sources are being used to send messages using your domain, and whether those messages are passing DMARC or not.
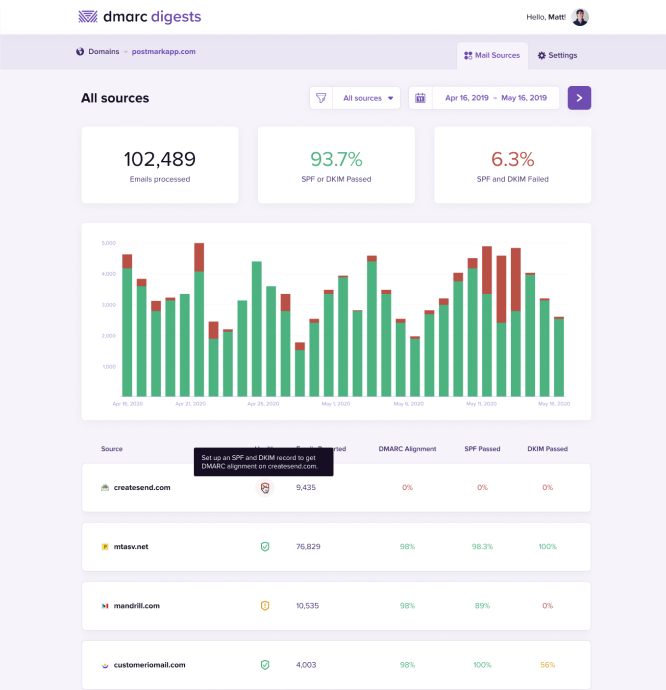
As noted above, the DMARC reports you'll receive are in the XML format and a bit ugly and complicated to look at. But services like DMARC Digests can help take those ugly XML format reports and turn them into beautiful reports that you can easily read and understand.
The first thing you will notice are statistics at the top. We have:
- Processed: The number of messages processed by ISPs and sent in the reports.
- Fully Aligned: The number of messages that had both SPF and DKIM passing.
- Failed: The number of messages that had neither SPF or DKIM present.
Your sources
Next on the list we have Your Sources. These are email sources (domains and IPs that send email like Postmark, Mailchimp, Google Apps, etc) and the count of messages for each. We consider these messages “trusted” because either it was signed with DKIM or it passed SPF. In other words, you updated your DNS to explicitly approve this email source. In the example above, mtasv.net is a domain from Postmarkapp.com, where most of the emails are fully aligned and passing. In some cases one of the two might not pass, so we try to differentiate that, but still consider it trusted.
The goal here is to identify each sender and make sure that both DKIM and SPF pass. This might involve contacting your ESP, setting up DKIM in Google Apps, and so on.
Other sources
Moving down, you see “Other sources” and a similar list. These email sources did not pass SPF or DKIM, so we make the assumption that you have not explicitly “approved” these senders. The “Unknown” aspect of this section is most important. In many cases, you may be sending email from legitimate sources, but not signing with DKIM or have not added the sources to your SPF record. This is where the real work begins to implement DMARC.
Forwarded sources
Below your Other sources, you will notice a section called “Forwarded email sources“. In this section you will see emails sent that passed DKIM but did not pass SPF DMARC alignment. In the majority of cases where DKIM passes DMARC while SPF fails is due to email forwarding by the recipient. For more information on this, head over to our help article here.
4. Convert all known email sources to be DKIM and SPF aligned #
In order for messages to achieve DMARC compliance, either SPF or DKIM must be aligned.
SPF Alignment
To achieve SPF alignment the basic SPF check must pass and the Return-Path domain must match the From domain.
DKIM Alignment
For DKIM alignment the DKIM signature on the message must be valid and the signature domain must match the From domain.
As you receive reports and dig into the data, the real work is to identify the sources that are legitimate, and whether those messages are DMARC compliant using SPF and/or DKIM. If you notice an IP address or Domain that you send from, you want to make sure this source is signing with DKIM and is added to your SPF record. This is a tedious process, but you can take your time and fix issues as you see them.
Identifying each source can be tricky. One way to make this easier is to create a list of each source where you know you send emails. As new sources come in the reports, you can try to match them to the known sources in your list. These sources could be email providers, ecommerce systems, marketing services, or even server notifications and alerts. Common examples include Google Apps (gmail), Salesforce, Intercom, Campaign Monitor, Mailchimp, and of course Postmark.
A useful feature in our free DMARC reports is resolving the source IP address. If you click on an IP address in the report, it will link to “https://whois.domaintools.com” which shows the location of the IP and the owner. For instance, a domain of emailsrvr.com and IP of 108.166.43.128 is unknown to me, but after following the link I can see this is from Rackspace. This may help me narrow down that it is from their hosting or email services.
Once you identify the source, you’ll want to look up the service that is sending the emails so you make the appropriate changes to your SPF or DKIM records. Services like Zendesk, Campaign Monitor, Google Apps, and Rackspace have articles on what SPF or DKIM records to add to your DNS. The harder ones are sources on your own servers where DKIM and SPF might not be as simple to implement. In some cases, it might be easier to migrate that email from your own email servers to a service like Postmark that can handle the DKIM and SPF for you.
Finally, you may see some failing source domains/IPs that don’t make sense to you. This can happen on legitimate messages from email forwarding where the SPF and DKIM headers are not preserved. If these sources are in the single digits, don’t worry about them as much. You will never be able to get all sources, so you have to decide where you draw a line in terms of how much you want to research the sources.
When it comes to analyzing DMARC reports, that sums up most of the process. As you add DKIM and SPF to more sources the number of unknown/threats should be reduced. Of course, you will never reduce these completely because spammers do spoof email for your domain. The hardest part of DMARC is figuring out when to publish a reject or quarantine record. This can only happen when you are comfortable with the number of known sources you have covered with both SPF and DKIM.
5. Start to quarantine email sources that do not pass DMARC #
Once you’ve been receiving and monitoring your domain's DMARC reports for a while (a few months at least) you should have been able to add all of your legitimate sending sources to your domain's DNS so that those messages are passing DMARC. Only once this is done should you consider updating your domain's DMARC policy to “quarantine“.
The “p=quarantine“ DMARC policy tells receiving mail servers that if they receive messages sent using your domain that do not pass DMARC, then to move those messages to the recipient's spam folder.
This way, legitimate messages sent using your domain from your sources will pass DMARC and be allowed through to the inbox, while messages sent by spammers or phishers that do not pass DMARC will not reach the inbox, and instead be moved to the spam folder -- helping keep your sending reputation healthy.
Note that you can also specify a percentage (pct) value so that you don’t have to commit fully to quarantining all emails that fail DMARC, at least right away. If you’ve copied the default DMARC entry we suggested above, you’ll see a variable of pct=100.
This governs the percentage of emails that will get effected by the DMARC policy. It’s recommended that when you first set your DMARC policy to quarantine that you start off only doing it to a small percentage and then increase over time.
For example, each week you could update your domain's DMARC policy so only a percentage of messages be quarantined:
- Quarantine 25% (p=quarantine; pct=25)
- Quarantine 50% (p=quarantine; pct=50)
- Quarantine all (p=quarantine; pct=100)
This gradual increase helps minimize the chances of missing a legitimate sender whilst also starting to provide a level of filtering to protect your domain and email delivery. You’ll want to communicate these kinds of aggressive tactics with your support team in case you begin receiving reports of lost email. This way, you’ll have a chain of communicate that can ensure problems are escalated and properly attributed to a more aggressive policy.
6. Publish a reject policy to reject emails that do not pass DMARC #
Like above, once you've monitored your domain's sending and are sure that your legitimate messages are passing DMARC, and after you've implemented and monitored the “p=quarantine“ policy for some time, you can then update your domain's DMARC policy to the the “reject“ policy.
Once your domain's DMARC record has been updated to use the “p=reject“ policy, any message sent from your domain that does not pass DMARC will simply be dropped by the receiving mail server. Meaning the message won't be delivered to the recipient's inbox, or even their spam folder -- it's simply dropped into some internet blackhole.
This helps ensure that messages using your domain sent from spammers and phishers will never even reach the eyes of the recipient, since those messages will fail DMARC and will be rejected outright by the recipient's mail server. This helps maintain your domain's sending reputation in a very powerful way.
We strongly suggest that you do not implement the “reject“ policy until you've fully monitored your messages to ensure that all legitimate messages sent from your known sources are passing DMARC.
And like with the “quarantine“ policy, we recommend you gradually update your domain's “reject“ policy so only a percentage of messages be rejected. For example:
- Reject 25% (p=reject; pct=25)
- Reject 50% (p=reject; pct=50)
- Reject all (p=reject; pct=100)
7. All done! Kind of... #
You might be thinking that now that you've updated your domain's DMARC policy to “p=reject“ that you are all done with DMARC monitoring, right? Hate to be a bad news bear here, but unfortunately that's not the case.
It's still very important to monitor those DMARC reports you receive to ensure sending sources (old and new) are still passing DMARC. Something may change with your sending set up or your domain's DNS settings that could suddenly cause your messages to no longer pass DMARC. And because your domain's DMARC policy is set to “reject“ those messages will be dropped and not reach your recipients. No good!
DMARC monitoring is the long game in terms of maintaining amazing domain reputation and deliverability. But, it's one of the most powerful tools to ensure that only your legitimate messages are reaching recipient inboxes, while also stopping spammers and phishers from using your domain to send spam.
8. How DMARC Digests can help 💜 #
All of the steps listed above can be a bit confusing, especially if you're not monitoring your sending domain's DMARC reports -- as then you will not know if your messages are passing DMARC or not, and thus you will not know when to update your domain's DMARC policy to “quarantine“ or “reject“.
It's for that reason that we created DMARC Digests. DMARC Digests gives you visibility into which sending sources are being used to send emails from your domains so you can quickly identify possible spoofing and phishing attacks.
This will help you track which of your domain's sending sources are legitimate, and whether messages sent from those sources are passing DMARC. You will then have all the information you need to take actionable measures against any non-legitimate sending sources using your domain for sending, like updating your domain's DMARC policy.
Our DMARC Digests app has a shiny dashboard which provides on-demand access to 60 days of DMARC reports, recommendations on how to identify and authorize mail sources, and a single place to monitor all your domains. Plus a dedicated support team who are just jonesing to help you ensure your messages pass DMARC! Click the link below to get started, or reach out to our DMARC Digests support team with any questions!
Protect your brand from email scammers
Our premium DMARC monitoring with a single dashboard to monitor all mail sources, 60 days of history, and actionable recommendations.
FAQ #
- Do all email service providers support DMARC?
- Not exactly. In order to fully support DMARC on your domain, the ESP must also set a custom
Return-Pathaddress domain. TheReturn-Pathis what ESPs uses to collect bounces, which is different from the from address. According to the DMARC spec, theReturn-Pathdomain must be at the same top level domain as the from address. At Postmark, we’ve made this a priority and implemented customReturn-Pathdomains. - Why do I see failing SPF reports for some legitimate sources?
- In some cases, an email provider may forward your email to another address. For instance, you send a newsletter to a customer and they forward it from their main mailbox to their Gmail account. While most email providers will properly preserve the from address and
Return-Pathaddress, others may rewrite it, causing a failure. While this may present a problem, it is limited to a small percentage. In addition, ISPs can still consider if a message has DKIM present in this case and allow it to pass. This is why it is important to have both SPF and DKIM passing on a domain.
