How to send transactional emails with Laravel PHP framework

In this post, we’ll go over two ways you can send Laravel emails via Postmark:
- We’ll explore the nuts and bolts of setting up the Postmark adapter for Laravel written by Craig Paul
- We’ll also at how you can send email via SMTP.
But first, let’s walk through signing up for a free Postmark developer account. If you already have a Postmark account, you can skip this step and go straight to the Laravel setup section.
Create a Postmark account and sender signature #
If you don’t have an account, head to the homepage and click “Start Free Trial” in the top right corner. Fill out your account details then click “Let’s get started.”

Once you’ve entered your account information, you’ll be taken straight to the Postmark dashboard:

Note: Postmark developer accounts are limited to 100 emails per month. Before you can send more than that, you’ll need to go through the account approval process by clicking on the "Request approval" button. To maintain high deliverability rates, Postmark is selective about the types of emails that can be sent.
Set up the Postmark adapter for Laravel #
In the following code examples, we’ll assume that you have a fresh new Laravel project using at least Laravel 5.7 and that you’re using a Mac. Let’s set up the Laravel Postmark adapter.
1. Open terminal and cd to your new Laravel project directory

2. Now run composer require coconutcraig/laravel-postmark:

3. Open up your config/services.php and add:
return [
        // ...
        'postmark' => [
            'token' => env('POSTMARK_TOKEN'),
        ],
    ];
Note: leave POSTMARK_TOKEN, you’ll add the actual secret to your ENV file next.
4. Open your .env file.
Change MAIL_MAILER from smtp to postmark.
Add POSTMARK_TOKEN=<YOUR-SERVER-API-TOKEN-HERE> to the bottom of the file and be sure to replace <YOUR-SERVER-API-TOKEN-HERE> with your Server API token, which you can find in your Postmark dashboard in the API Token section.

That’s it!
Now whenever you send email through your Laravel app, it will be sent via your Postmark account.
Note: If you’re running a version of Laravel older than 5.7, you can check out and use an older branch of this adapter:
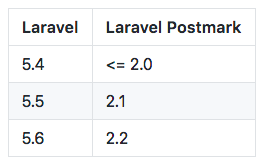
If you're running older versions, you can check the changelog in GitHub to figure out version compatibility.
Send email via SMTP #
Now let’s look at what it takes to send email via SMTP through Postmark instead of through the Postmark API.
1. Log into your Postmark dashboard, and head to the SMTP tab within the “Setup Instructions” section:

2. Next, open up config/mail.php in your favorite text editor.
Change the MAIL_HOST to smtp.postmarkapp.com.
Change the global from name and address to match the sender signature you set up during the Postmark account creation process above. If you have an existing Postmark account and skipped the account creation step above, you can find your sender signature by clicking “Sender Signatures” from your Postmark dashboard.
Finally, change the MAIL_USERNAME and MAIL_PASSWORD to match the username and password listed in your setup instructions:
A couple of notes:
- Yes, the username and password are intentionally the same. 😉
- You can ignore the sendmail driver path as this sends through SMTP, not sendmail.
- Additional ports and authentication protocols are listed in your setup instructions (in the black box above), but if you don’t know what you’re doing, it’s best to leave them defaulted to port
587, andtlsfor the protocol.
Big props to Craig Paul for open sourcing his Postmark adapter for Laravel.
